Contents
After ogling Pinterest photos of patriotic fingernails, 10-tier wedding cakes, skinny jeans and Jimmy Choo handbags, it’s easy to feel intimidated about creating your own board if your topic is just plain boring and doesn’t lend itself to stunning images.
Maybe you sell ebooks about yucky topics like jock itch, bad breath or hemorrhoids–ailments that are next to impossible to illustrate.
Or maybe you’re a corporate coach who teaches organizational management. How do you even begin to pin images for a subject like that?
Here’s how to use Pinterest: By using PowerPoint to create dozens of simple JPGs featuring short “how-to” tips. That’s what I’ve been doing this past year.
My board, 50 Tips for Free Publicity, has consistently ranked Number One on Google search (unpaid) for the phrase “free publicity” for several months. It even outranks my website that features more than 2,000 pages of content!
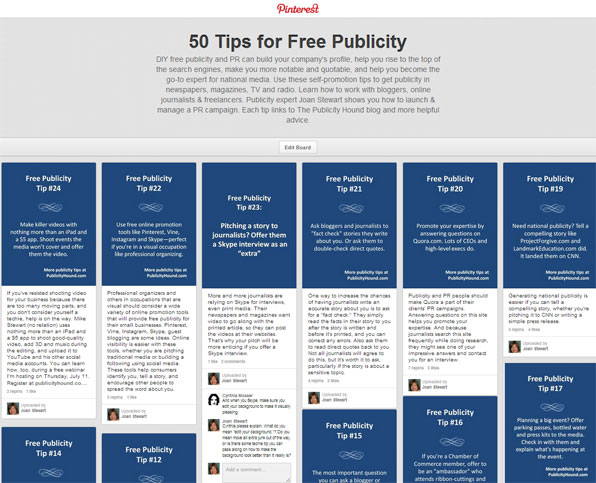
As you can see, there’s nothing glamorous about my board. You won’t find one photo. Just slide after slide of how-to tips written in white letters, on a solid blue background, and keyword-rich descriptions with hashtags. As of this writing, I’m only on Free Publicity Tip 35.
Here’s the real power of that board: Each image links to a blog post. And the PowerPoint JPEG within each post at the blog links back to the board.
Here’s a short video that illustrates how it works.
At first, this seems like a lot of work. But much of it can be delegated to a virtual assistant. And you don’t have to write a new blog post every time you want to add a pin.
Review posts on a common topic that you’ve written the last several months and excerpt helpful tips, and then create your slides.
Here’s how to get started:
Name Your Pinterest Board Carefully
Think keywords. You have 100 characters for the board name. But the visual limit is only 26 characters so try not to exceed that number. Mine is exactly 26.
Decide how many tips you want to include on the board and use that numeral in the board’s title (50 Tips for Free Publicity).
If people know there are 20 or 50 or 100 tips on a topic that’s important to them, they’ll want to see all the tips, and they’ll most likely subscribe to the board. But don’t feel as though you must stop when you reach the limit.
If you pin more than you promised, don’t rename your board later because the URL will change and subscribers will no longer be able to see what you’re pinning.
Also Read: How To Write Fascinating Amazon Book Listings To Sell More Books?
Write a Meaty Board Description
Pinterest allows 500 characters. I’ve heard that a best practice is not to exceed about 250. I took a chance, however, and used every character allowed so I could insert keywords galore.
And it’s working. Here’s my board description, with keywords in bold.
“DIY free publicity and PR can build your company’s profile, help you rise to the top of the search engines, make you more credible, and help you become the go-to expert for national media. Use these self-promotion tips to get publicity in newspapers, magazines, TV and radio. Learn how to work with bloggers and online journalists. Publicity expert Joan Stewart shows you how to launch and manage a PR campaign. Each tip links to The Publicity Hound blog and more do-it-yourself promotion advice.”
Write Short Tips and Descriptions
Most tips on my board are two sentences with no more than about 25 words total. Most of them begin with a verb, similar to a call to action.
Don’t promote from within these tips! Remember, you’re linking from each pin to a blog post. At the blog, you can promote whatever you want. But if the Pinterest board looks like a free commercial, people will lose interest.
Number every image so people can see immediately that they’re part of a series. Here’s a pin from my board:
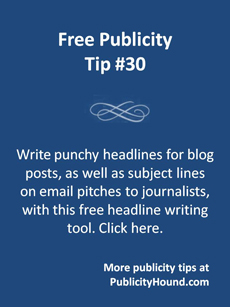
Occasionally, when I’m in a hurry and don’t have time to write a new blog post, I’ll take a shortcut and go back to my blog and choose a post that has a tip I want to feature. When I create the PowerPoint image, I simply insert it into the post before I pin it to the board.
Take the extra time to write complete descriptions for each pin, and don’t forget to include lots of keywords. I try to use all the space available.
Ideas for Pinterest Boards
Here are some examples of boards you might consider, depending on your job and area of expertise:
- An author who writes Civil War romance novels can create a board filled with interesting facts about romance in the mid-1800s.
- A speaker who presents workshops on Neuro-Linguistic Programming can offer tips on how to use NLP to be successful.
- A consultant who teaches companies how to create content can have separate boards for video tips, infographics tips, ebooks tips, podcast tips, etc. Make the images on each board a different color so people can identify each board by color.
- And what about that expert on jock itch? How about a board on “Jock Itch Causes, Symptoms and Treatments”?
How to Create Your Images
PowerPoint has several design templates from which to choose. You don’t have to start from scratch each time you create an image. Use the image for Tip #1 as the template for Tip #2 and so on. The size of each JPEG tip is 230 by 307 pixels–ideal for Pinterest.
Simple fonts like Verdana, Calibri, and Arial are the easiest to read. Keep all fonts and point sizes identical on all your images so the board looks consistent. Make sure the color of the text isn’t too similar to the color of the background.
Include your website on every slide for branding.
How to Link to the Blog Post
After you create your image, turn it into a JPEG. This next part is very important and partially responsible, I’m convinced, for my board’s high Google ranking.
Name each image with your primary keyword phrase. My primary phrase is “free publicity.” My images are named “free publicity tip podcast,” “free publicity tip press releases,” “free publicity tip headlines” etc. That extra little step of renaming an image so it doesn’t show up as “IMG00” is well worth the minute it takes to insert keywords.
Hashtags help people find your content. On Pinterest, however, hashtags are only searchable from the pin descriptions.
Don’t use them in the title of your board or the board description. You can use a hashtag at the beginning of a word within the description, or as a stand-alone hashtag at the end. If you think you understand hashtags, take this quiz.
How to Link Back to Your Pinterest Board
Let’s say each pin on your board links back to a blog post. A visitor who arrives at one of those posts via the search engines might have no idea that you’re on Pinterest or that the image that includes the tip embedded within the post is part of a Pinterest board.
To lead the visitor back to your board, remove the URL of the image of the how-to tip and replace it with the URL that links to your entire board. Here’s how to do it in WordPress:
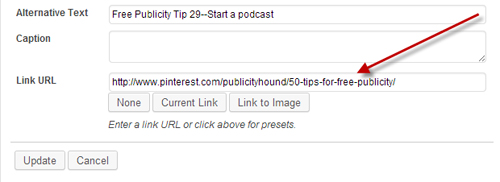
When someone clicks on the image at your blog, they’ll be taken right over to the board where they can read more tips.
Also Read: Sell More Books on Amazon – Understanding Keywords, Categories, and Amazon’s Algorithms
Don’t just pin. Remember to Like, Comment, and Share other people’s content. It’s a great way to build relationships and make people curious to see what you’re all about. In the process, they might discover your tips board.
Also, periodically check your Pinterest Analytics to see which boards and pins resonate most with your followers.
If you want a super-fast way to promote your blog on Pinterest by creating a board of photos, see How I use Pinterest to link to old blog posts.
Have fun on Pinterest, and brace yourself for traffic galore!
